

How to Change Web Hosting Providers Without Downtime
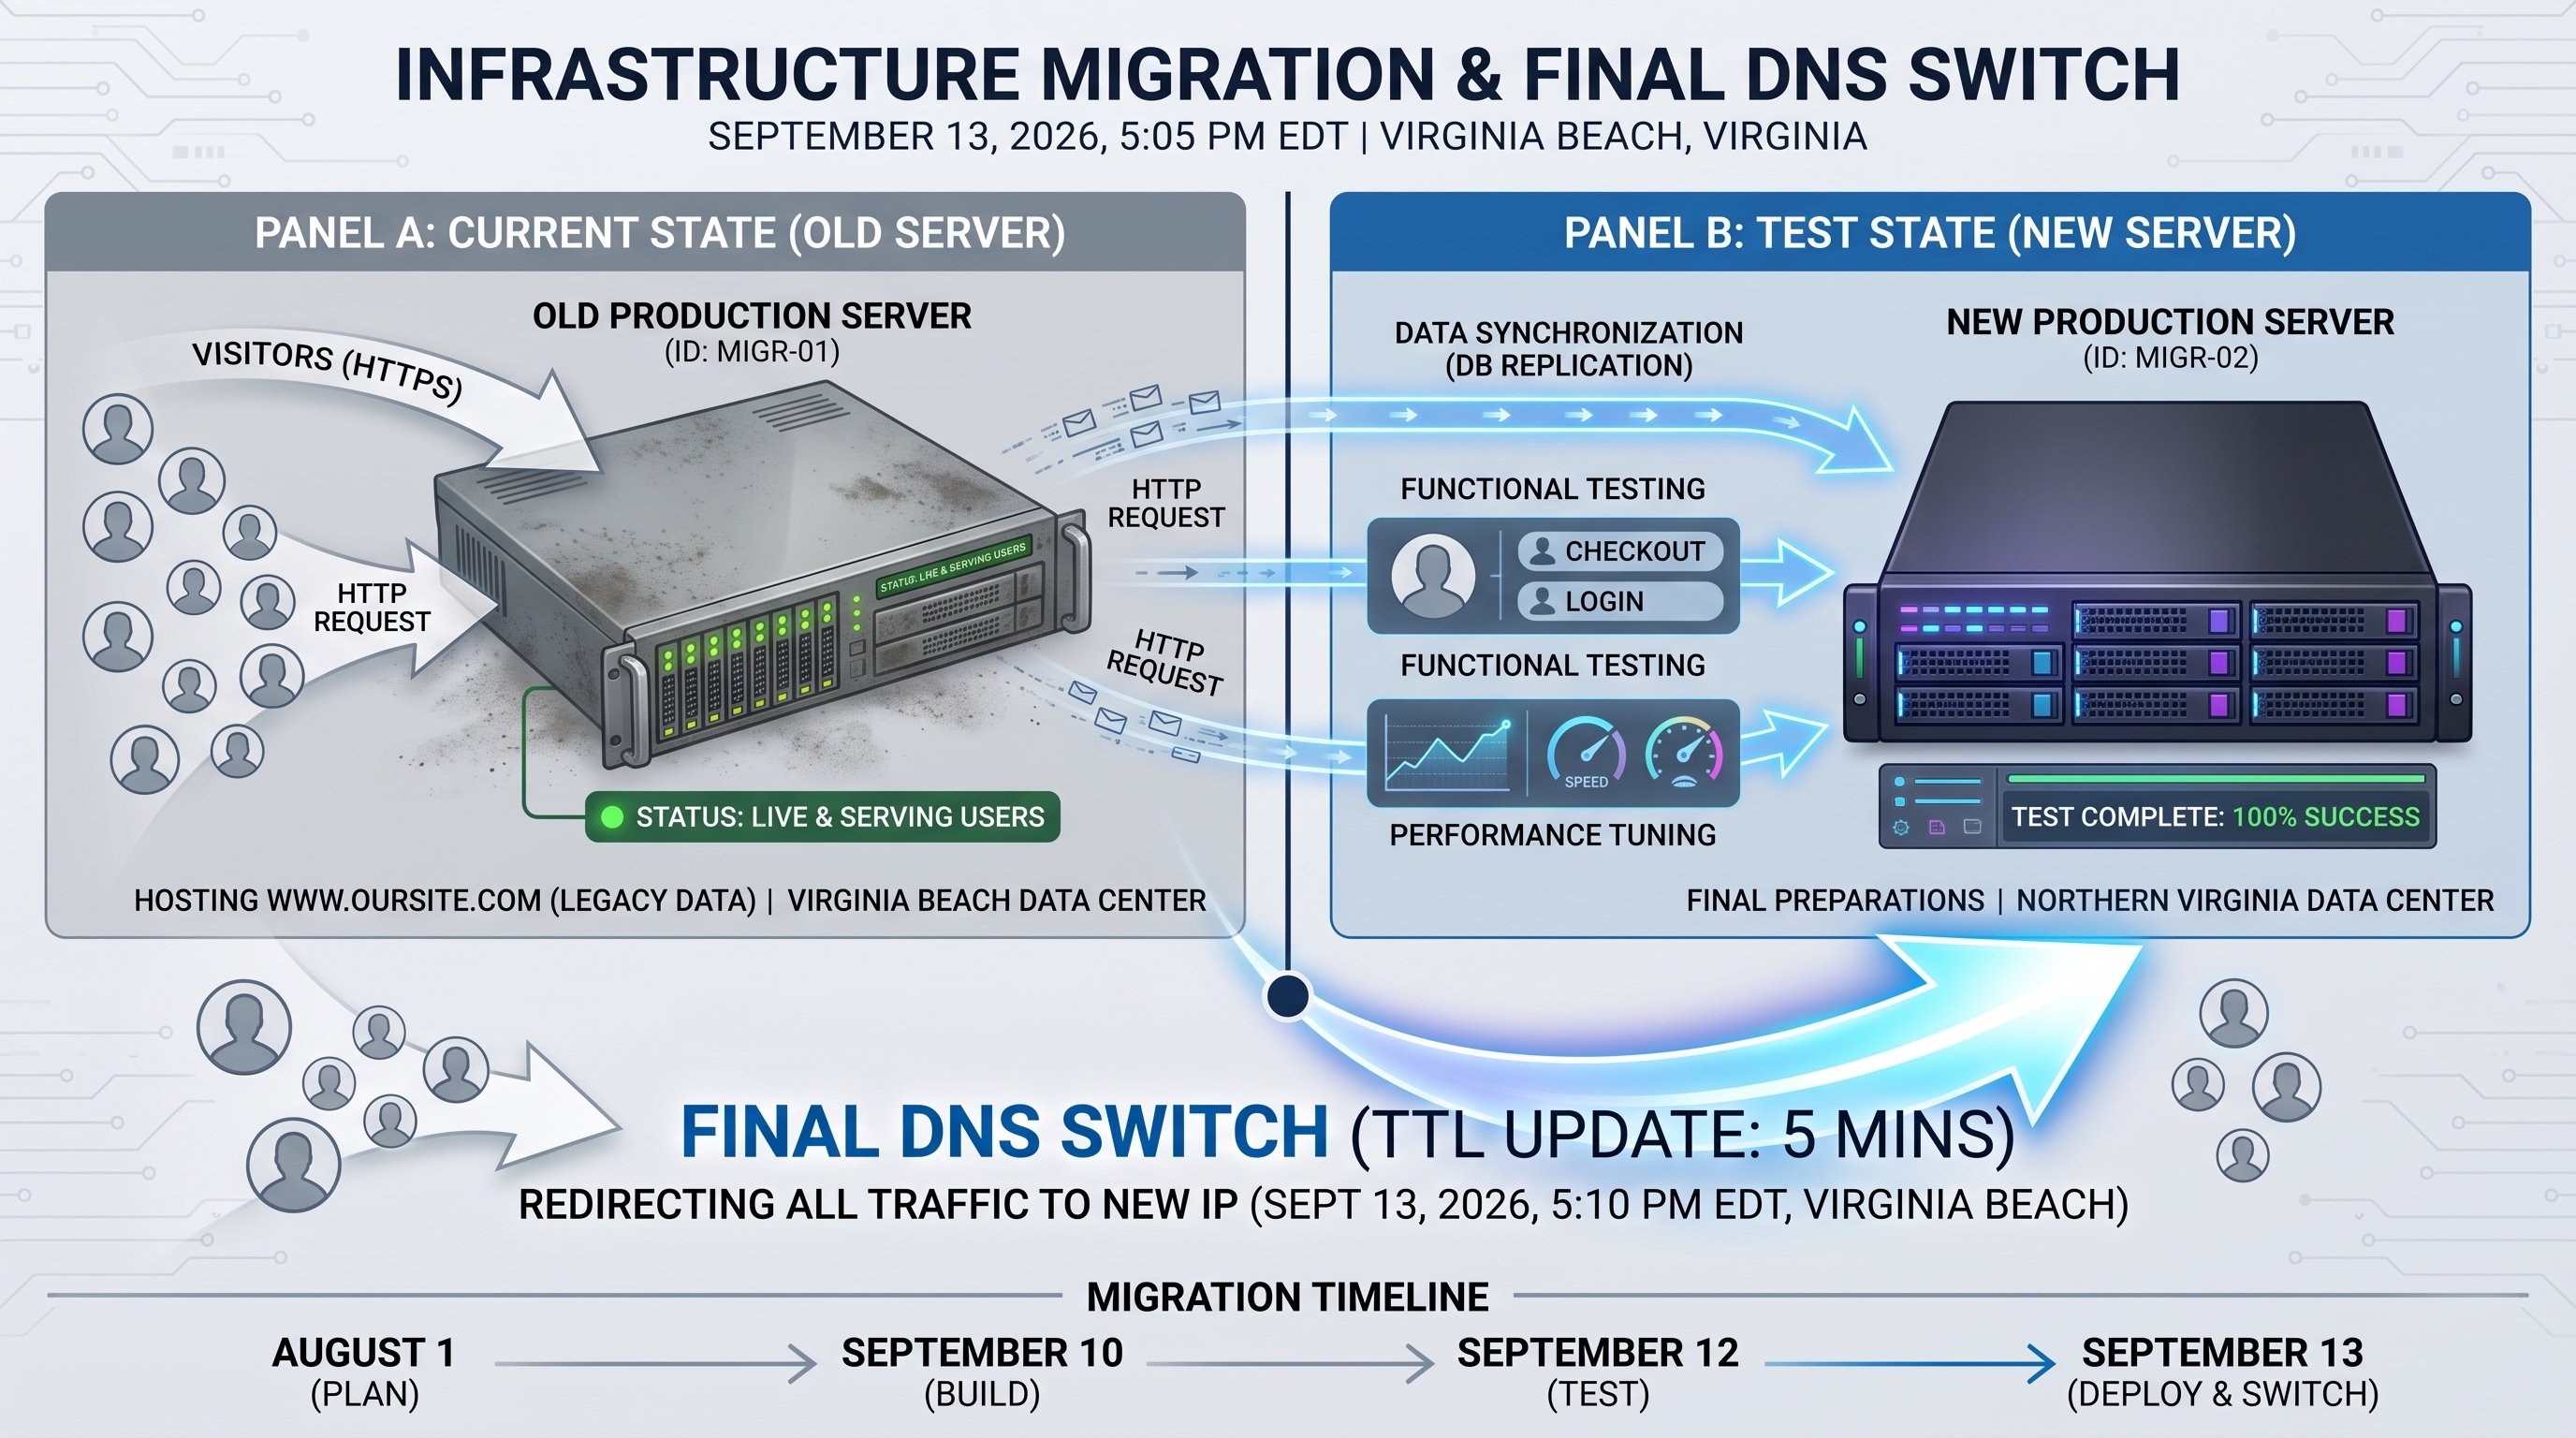
Changing web hosting providers without Downtime comes down to one principle: your old host keeps serving the live site. At the same time, you build, test, and verify a complete copy on the new host — and DNS only switches after the new environment is proven.
Done in the right order, the actual cutover takes minutes, and your visitors never see a gap. Done in the wrong order, you get the horror stories: dead sites, lost orders, and — the one nobody warns you about — broken email. We address this further in our article Domain names, name servers and DNS zone files explained.
The Zero-Downtime Migration Process, Step by Step
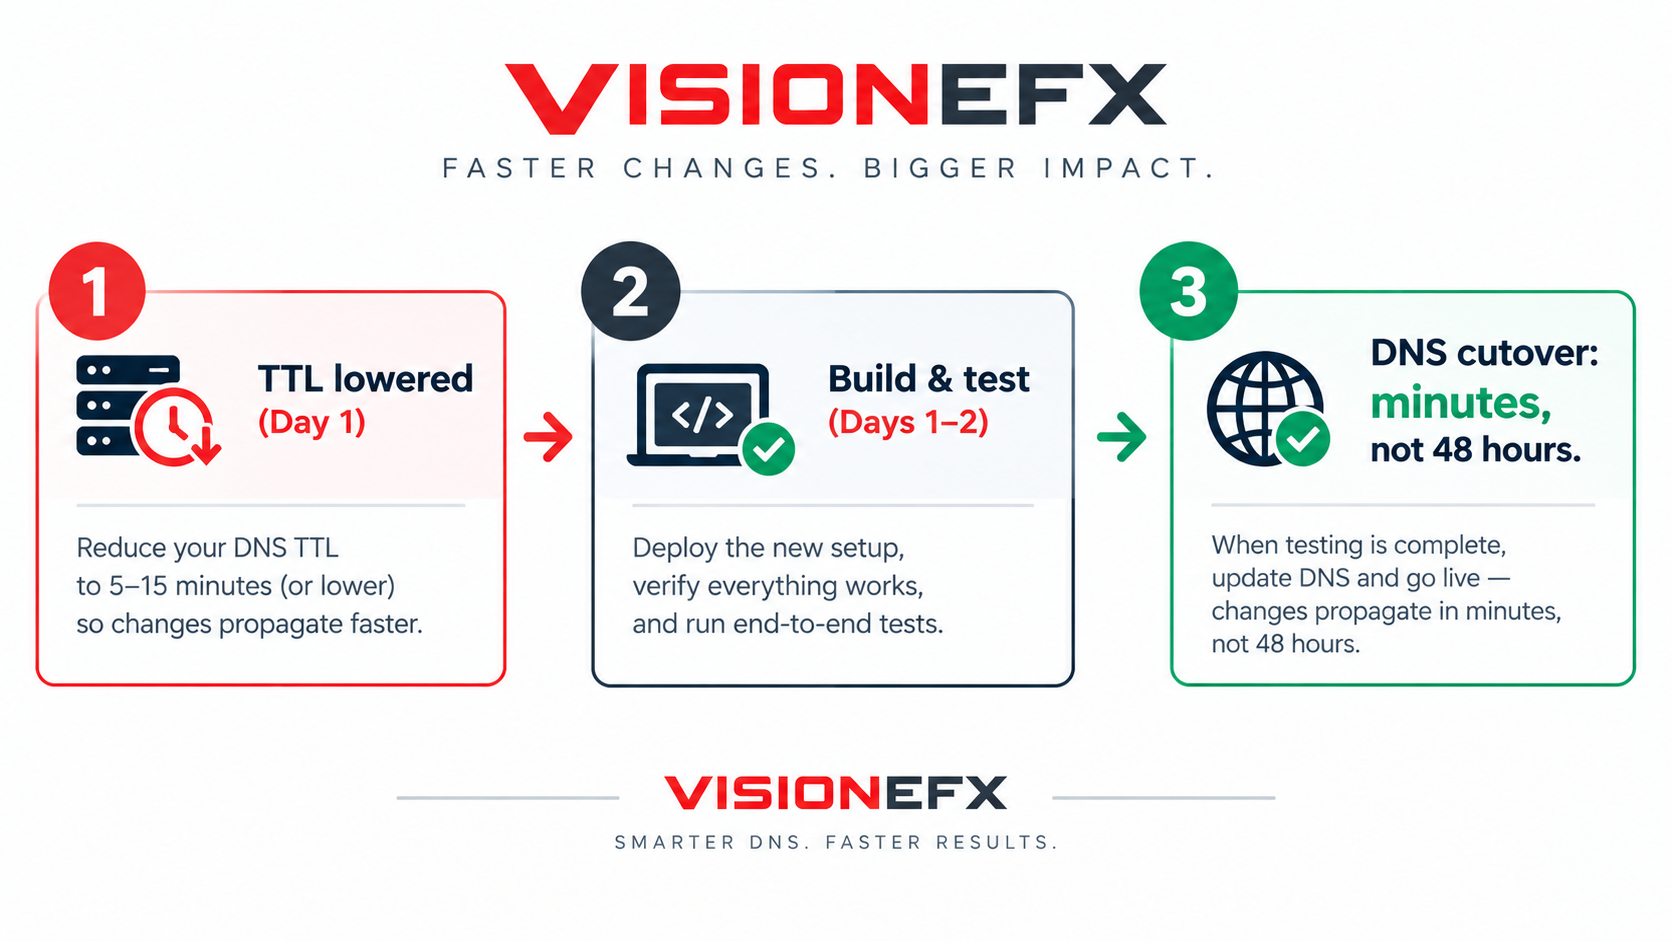
This is the process VISIONEFX has used to launch and cut over client WordPress sites on cPanel infrastructure for 25+ years. It works for a 6-page brochure site or a complex 10,000-page WooCommerce store; the steps are the same, but the level of care changes.
Step 1: Audit everything before you move anything
Inventory what actually lives at your current host — it’s always more than “the website”:
- Files and databases (a WordPress site is both — wp-content plus the MySQL database)
- Email accounts hosted with the web host — the single most common migration casualty
- DNS records: A, CNAME, MX, and the TXT records (SPF, DKIM, DMARC) that keep your email out of spam
- SSL certificates, cron jobs, subdomains, redirects, and the **PHP version** the site runs on
Miss an item here, and you’ll find it at 9 p.m. on cutover night.
Step 2: Lower your DNS TTL — 24 to 48 hours early
This is the professional move most guides bury. Your domain’s A record carries a TTL (time to live) telling the internet how long to cache it — often 3,600 seconds or more. Drop it to 300 seconds a day or two before the move. Now, when you eventually update DNS records, the world sees the new server in minutes instead of the mythical “24–48 hours of propagation.” That myth isn’t a law of nature; it’s just a high TTL nobody lowered.
Step 3: Take full backups — and keep a copy off the server
In cPanel, generate a full account backup; for WordPress specifically, capture the complete file system (wp-content above all) and export the database via phpMyAdmin. Download a copy to local storage. The rule is absolute: never migrate the only copy of anything. Backups aren’t step one of moving — they’re step one of being allowed to move.
Step 4: Build the complete site on the new host
Provision the new hosting account, match or deliberately upgrade the PHP version, create the new database, upload the files, import the database, and update wp-config.php with the new credentials. For cPanel-to-cPanel moves, a full-backup restore transfers accounts largely intact. Nothing public has changed yet — the live site is still serving from the old host, untouched.
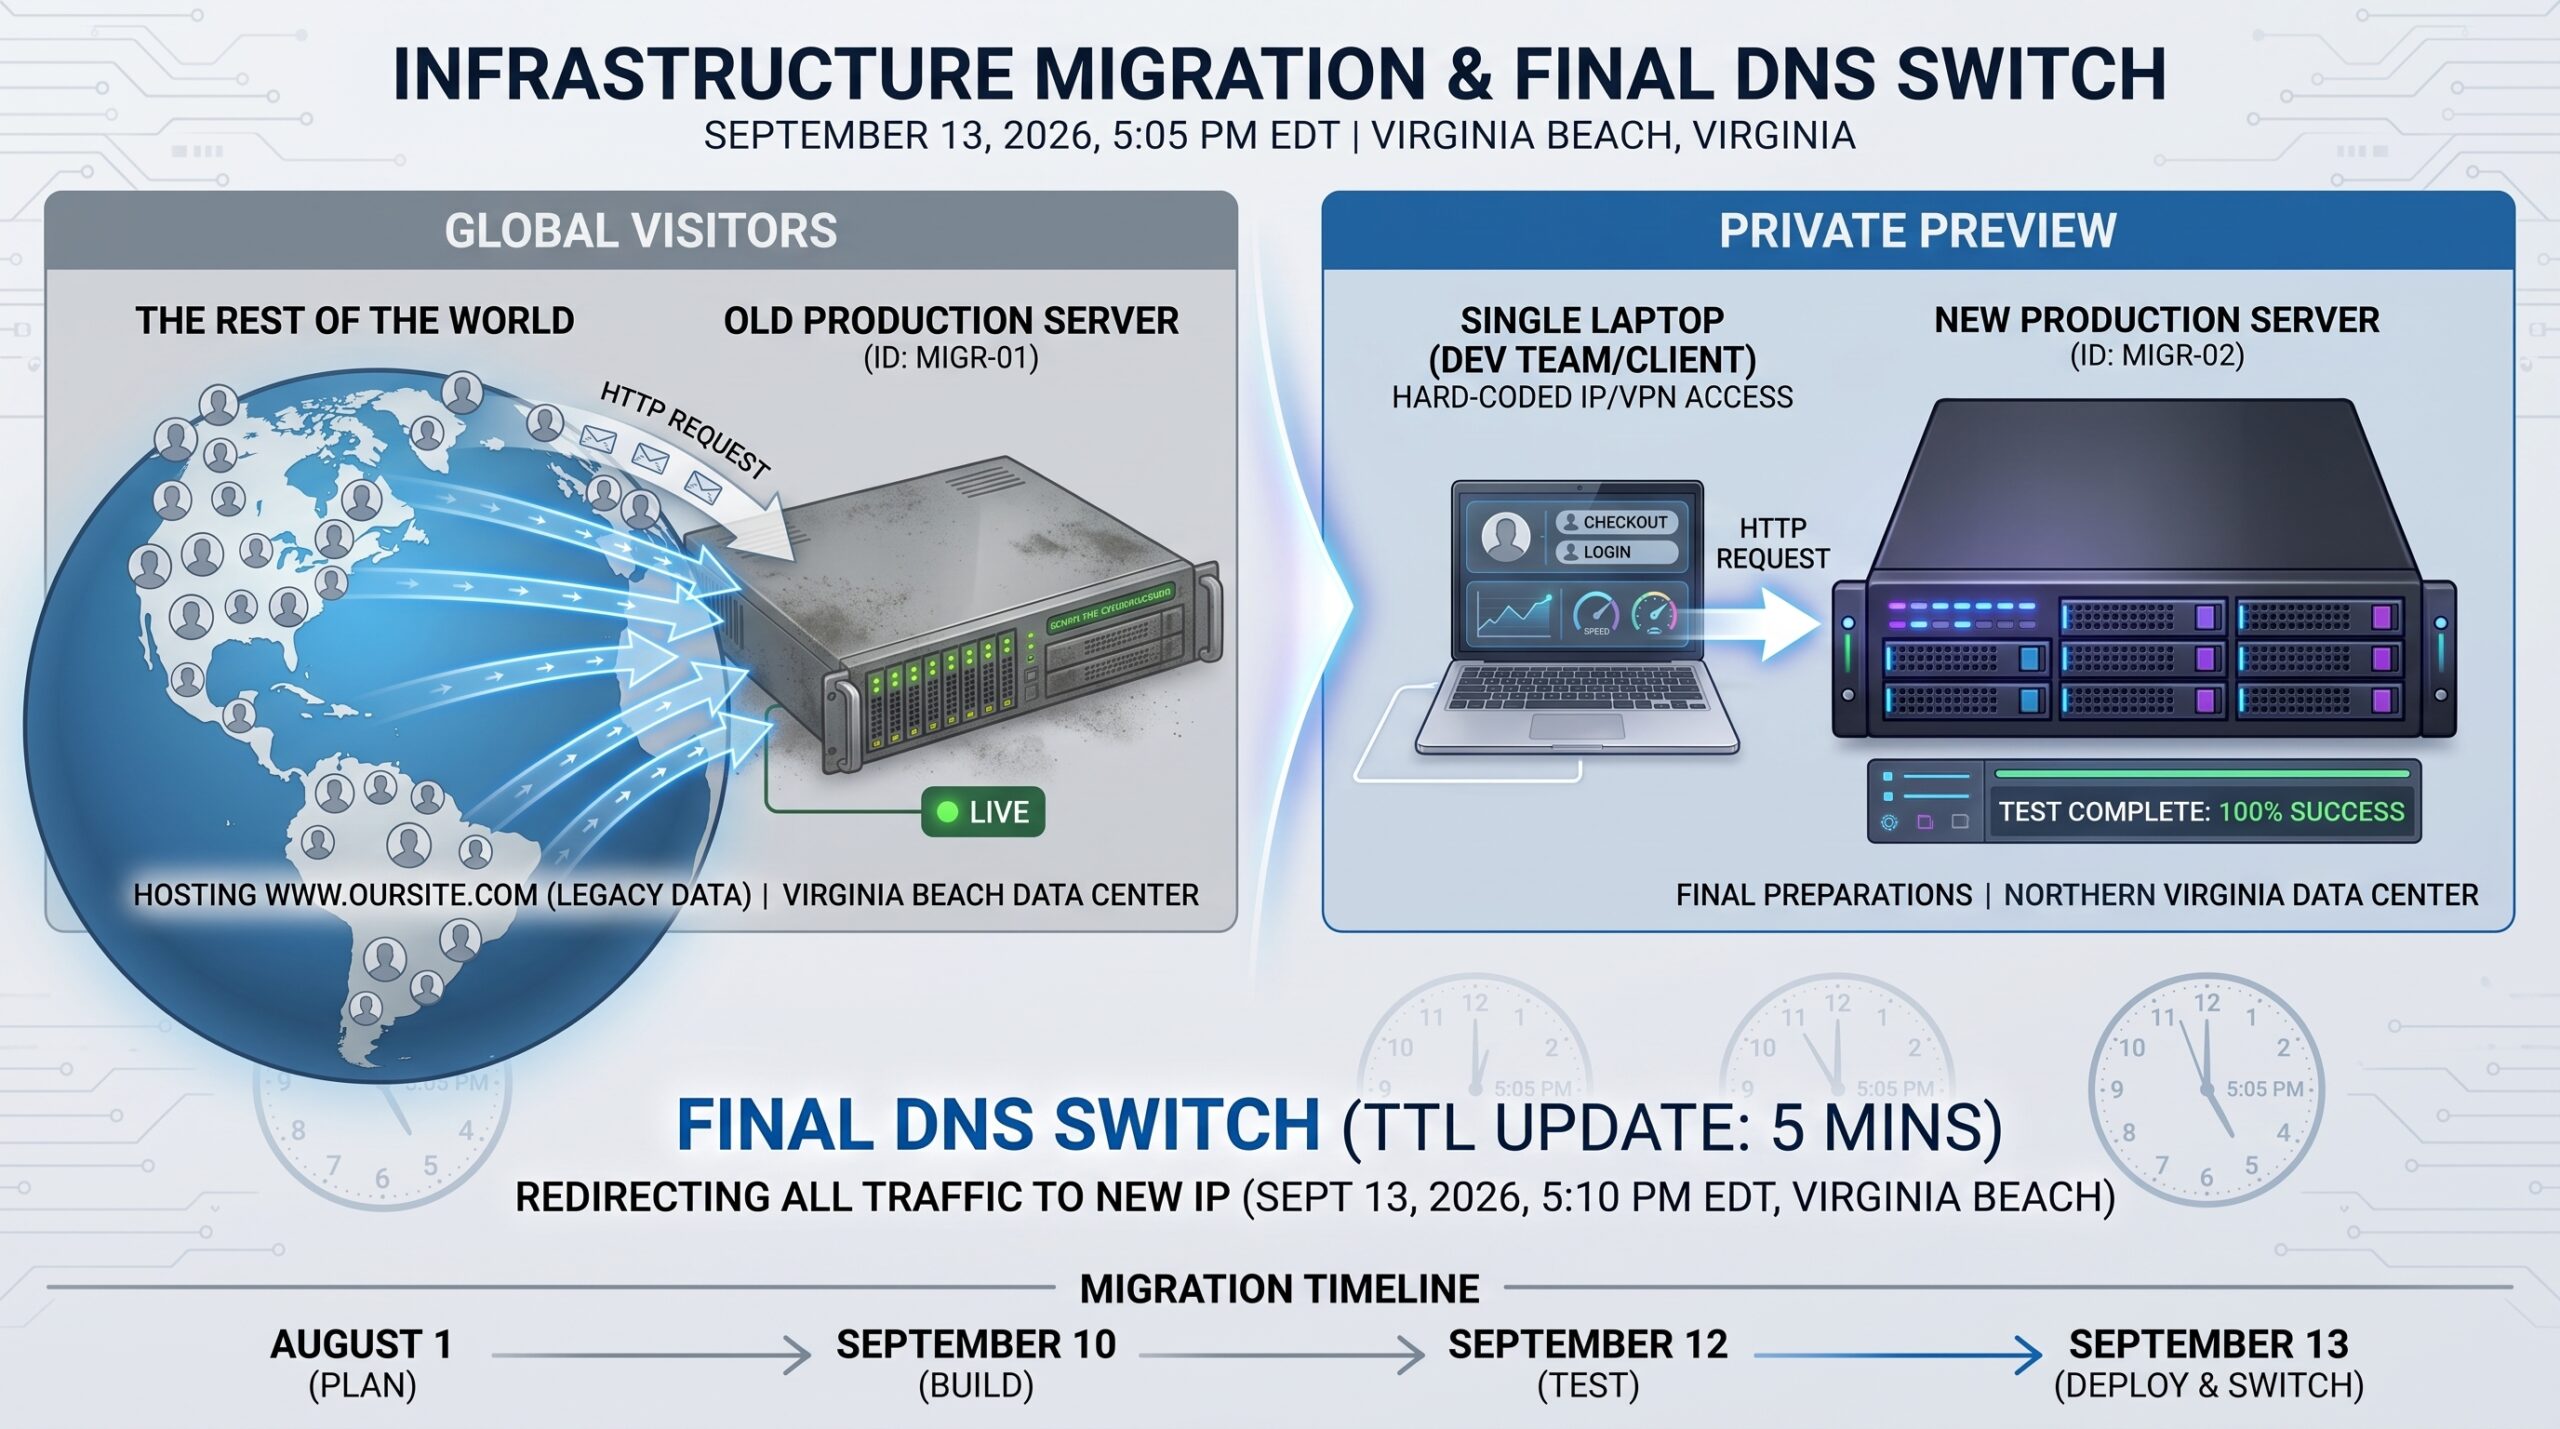
Step 5: Test the new server with a hosts-file preview — before DNS knows it exists
Here’s the keystone of zero-downtime work: edit your computer’s **hosts file** to point your domain at the new server’s IP. Your machine — and only your machine — now loads the site from the new host while the rest of the world still sees the old one. Click through everything: pages, images, forms, HTTPS, checkout if you have one. Every problem you find here is a problem your visitors never see. (Hosts-file testing beats temporary preview URLs for WordPress, which rewrites links to its configured domain.)
Step 6: Freeze content and run a final sync
For sites that change daily — new orders, posts, form entries — schedule a short content freeze, or re-export and re-import the database immediately before cutover so nothing created during the build window is lost. A brochure site can skip this; a WooCommerce store cannot.
Step 7: Get SSL working on the new server
Issue the certificate on the new host (AutoSSL / Let’s Encrypt on cPanel) and confirm HTTPS loads cleanly in your hosts-file preview. Some issuance methods want DNS pointing at the new server first — plan for that with DNS-based validation or a brief AutoSSL window at cutover, but never discover it after the switch.
Step 8: Cut over — update the DNS records
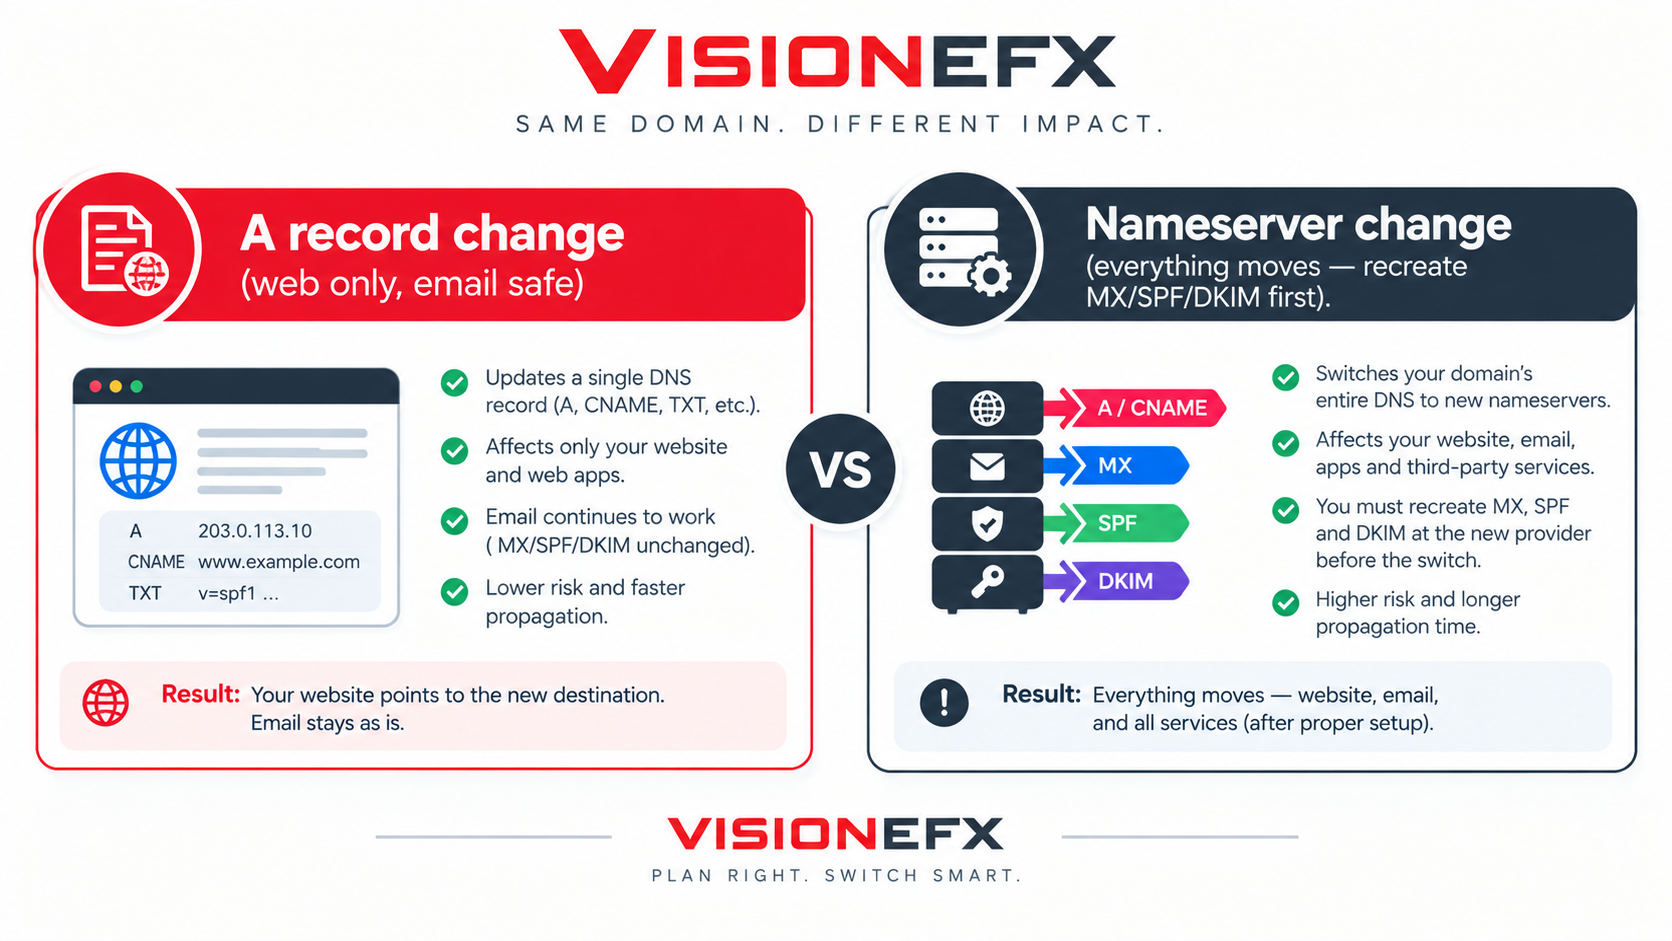
Two very different ways to do this, and choosing wrong is how email dies:
- Update the A record only (at your existing DNS provider) — the surgical option. Web traffic moves to the new server; your MX and TXT records — and therefore your email — stay exactly where they are. This is the default for a web-only move.
- Change nameservers — the sledgehammer. This relocates *all* DNS records to the new provider, and every MX, SPF, and DKIM entry must be faithfully recreated there first, or mail stops. Only do this deliberately.
With your TTL already at 300 seconds, the world follows in minutes.
Step 9: Verify, monitor, and keep the old host as your rollback
Confirm propagation, watch the new server’s logs fill with real traffic, and send test submissions through every form. If your outbound mail IP changed, verify SPF/DKIM alignment so lead notifications don’t start landing in spam. Then leave the old account running for at least a week. It’s the cheapest rollback insurance you’ll ever buy. Cancel it only when the new environment has a clean week behind it.
We Do This So You Don’t Have To: Managed Migrations
VISIONEFX handles website migrations and hosting setups end-to-end. We manage a portfolio of client WordPress sites on cPanel hosting environments. Hosting moves are part of our maintenance and support practice: the pre-migration audit, full cPanel and database backups, WordPress migration and configuration, hosts-file verification, SSL issuance, DNS record cutover with pre-lowered TTLs, and post-move monitoring of traffic, forms, and email deliverability.
Migrations are covered under our prepaid care-plan tiers or quoted as a standalone project — either way, your site is moved by the team that has been managing WordPress and DNS records since 2000, backed by 150+ five-star Google reviews. You keep serving customers; we move the infrastructure underneath you.
Discipline= Migration Success
Our launch discipline is the same: every redesign we ship cuts over a live business site using the process above — staged build, hosts-file verification, redirect mapping, DNS switch — with the old environment held as a rollback until the new one proves itself.
The move: [From → to: e.g., aging shared hosting → managed cPanel environment; site size, database size, email accounts involved.]
The complication: [e.g., email hosted with the old web host; WooCommerce orders requiring a delta sync; expired SSL.]
The result: [Downtime measured: e.g., zero visitor-facing Downtime; cutover completed in X minutes; page load improved from X.Xs to X.Xs on the new host.]
Frequently Asked Questions About Website Migration
Will my website go down when changing hosting providers?
No — not if the migration is sequenced correctly. The old host keeps serving the live site while a complete copy is built and tested on the new server using a hosts file preview. DNS is updated only after the new environment is verified, and with the TTL lowered in advance, the switch propagates in minutes with no visitor-facing gap.
How long does a website migration take?
Building and testing the new environment takes anywhere from a few hours for a small WordPress site to a few days for a large store with integrations. The cutover itself — the DNS record update — takes minutes when the TTL was lowered 24 to 48 hours in advance. The old “24–48 hours of propagation” only applies when nobody lowered the TTL first.
Will changing web hosts affect my email?
It can — email is the most common migration casualty. If your email is hosted with your current web host, or if you switch nameservers without recreating your MX, SPF, and DKIM records at the new DNS provider, mail stops. A web-only move should change the A record and leave MX and TXT records untouched; if email moves too, those records must be migrated deliberately.
Does changing hosting providers affect SEO?
Changing hosts does not hurt SEO when the domain and URLs stay the same, and the site never goes down — search engines don’t rank you by server. The real SEO risks are extended Downtime, missing pages, or broken redirects during a sloppy move. Done cleanly, rankings hold, and faster hosting often improves Core Web Vitals afterward.
How do I migrate a WordPress site to a new host?
Migrate WordPress by backing up all site files and exporting the MySQL database, uploading both to the new host, updating wp-config.php with the new database credentials, and testing the full site through a hosts-file preview before touching DNS. Once forms, HTTPS, and pages verify on the new server, update the A record to complete the move.
Which DNS records need to change when switching hosts?
For a web-only move, only the A record (and any www CNAME pointing at the old server) needs to change — MX and TXT records stay put so email keeps flowing. Changing nameservers moves every DNS record to a new provider at once and should only be done after MX, SPF, DKIM, and DMARC entries are recreated there exactly.
Does VISIONEFX handle website migrations for clients?
Yes — VISIONEFX handles migrations and hosting setups end-to-end: pre-migration audit, full cPanel and database backups, WordPress migration, hosts-file verification, SSL setup, DNS cutover, and post-move monitoring of traffic, forms, and email deliverability. Migrations are available under VISIONEFX’s prepaid care-plan tiers or as a standalone project, managed by the same team since 2000.
Move Hosts Without Betting Your Business On It
If your hosting is slow, overpriced, or held hostage — but the fear of Downtime has kept you frozen — that’s exactly the project we run. Request a migration assessment, and we’ll audit what’s actually at your current host, flag the email and DNS landmines, and quote the move.